ShopDreamUp AI ArtDreamUp

Deviation Actions


Suggested Deviants


Suggested Collections


You Might Like…


Description
yup, another one...
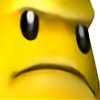
luke triton from professor layton this time
how to do
(TIP finish with the face, it's the last you should do)
1: cut and fold everything
2: glue his shirt
3: attach the arms at the white top of the shirt
4: glue it to the underside of the face (picture)
5:The 2 brown lines:
fold the sides like this and attach them to the pants ([link])
6: glue the legs
(The 2 brown lines: fold the sides like this and attach them to the pants) (LINK)
under his shirt (important: the 4 white spaces at the top of the legs must face upwards, glue them and place them under his shirt
7: glue the folded hair to his face ( use the white spaces from the hair on the white spaces on the face)
8:The 2 brown lines:
fold the sides like this and attach them to the pants ([link])
9: The HAT!
(the blue pieces)
glue the 2 lines together with the white space, stick the circle on top of it by glue-ing it
the glue the blue small half circle to the front and attach it to luke’s head
([link])= hat+hair
10: This part is tricky so pay attention!
you must glue the head, which can be difficult.
start with the back of the head and work you way to the front, the front is the hardest out of all the things.
glue the white spaces and attach to the right piece where it belongs (so you will see no white spaces when finished)
11: at the front of his head , you might want to use something thin like a needle to put the white space at the top of his head. (if your having trouble with this, tell me )
12 The bag: use the picture as a helping hand")
([link])
stick both sides of the longest brown line too the bag,
the close the bag by folding it and stick it to luke's arm aaand
FINISHED!!
luke triton from professor layton this time
how to do
(TIP finish with the face, it's the last you should do)
1: cut and fold everything
2: glue his shirt
3: attach the arms at the white top of the shirt
4: glue it to the underside of the face (picture)
5:The 2 brown lines:
fold the sides like this and attach them to the pants ([link])
6: glue the legs
(The 2 brown lines: fold the sides like this and attach them to the pants) (LINK)
under his shirt (important: the 4 white spaces at the top of the legs must face upwards, glue them and place them under his shirt
7: glue the folded hair to his face ( use the white spaces from the hair on the white spaces on the face)
8:The 2 brown lines:
fold the sides like this and attach them to the pants ([link])
9: The HAT!
(the blue pieces)
glue the 2 lines together with the white space, stick the circle on top of it by glue-ing it
the glue the blue small half circle to the front and attach it to luke’s head
([link])= hat+hair
10: This part is tricky so pay attention!
you must glue the head, which can be difficult.
start with the back of the head and work you way to the front, the front is the hardest out of all the things.
glue the white spaces and attach to the right piece where it belongs (so you will see no white spaces when finished)
11: at the front of his head , you might want to use something thin like a needle to put the white space at the top of his head. (if your having trouble with this, tell me )
12 The bag: use the picture as a helping hand
([link])
stick both sides of the longest brown line too the bag,
the close the bag by folding it and stick it to luke's arm aaand
FINISHED!!
Image size
1047x733px 96.34 KB
© 2012 - 2024 terrmedia
Comments1
Join the community to add your comment. Already a deviant? Log In
Hiya !! I Made this but it unfortunately wont stand; do u know any ways to make it stay up on its own ? ^^)